Migration guide
Introduction
The security service split has created a distributed system and data across different databases. In the past, we have been sorting out the data synchronization from [authorization] to [security]. Now you can normalize shared database for being compatible with the new security system and generate a security configuration package (authorization and users) for initializing the security database.
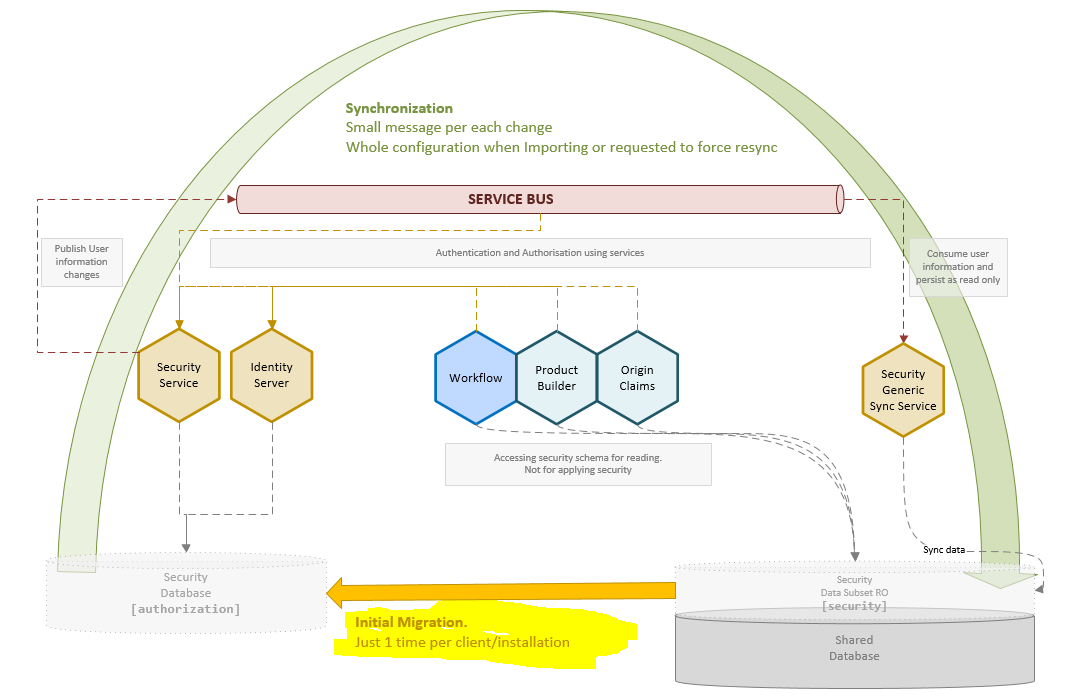
This document describes the process for migrating the information from [security] to [authorization] using the sequel-security tool.
Migration flow
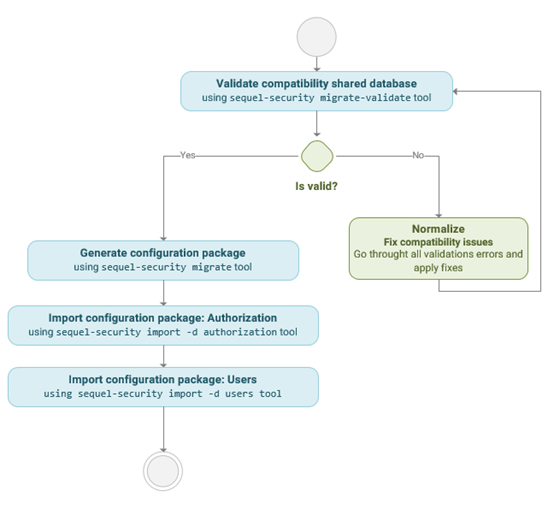
The steps to migrate the data from [security] to [authorization] are the following:
1. Upgrade [security] legacy schema
- Apply latest security schema definition (aka dacpac). Due to some dependencies with Workflow you will need to manually delete [workflow].[UserProfile] view.
- After upgrading the [security] schema recreate manually removed objects: manually or deploying workflow database definition.
2. Check the compatibility level of the legacy database.
- You can include a JSON file for validating generic columns for Workflow and Product Builder if required
3. Normalize the database fixing the compatibility issues if the compatibility is not valid
4. Generate configuration package files from the legacy database
5. Import authorization entities: groups, roles, permissions, securables and user types
6. Import authorization users and memberships
1. Validate compatibility
The list of validations to be applied are:
- InvalidKey: the entity key is not like “{appKey}.{Code}”
- InvalidAppKey: the entity appKey is empty or unknown
- InvalidCode: the entity code is empty or different from the entity key code
- NameRequired: the entity name is empty
- DisplayNameRequired: the group display name is empty
- KeyDuplicated: there are two or more entities with the same key
- MissingPublicGroup: Public group does not exist in the application
- MismatchPermissionApplication: the role and securable of a permission have different appKey.
- MismatchMembershipApplication: the group and role of a membership have different appKey
- SecurableNotFound: a role has a permission whose securable does not exist
- RoleNotFound: a user has a membership whose role does not exist
- GroupNotFound: a user has a membership whose group does not exist
- UsernameNotFound: a membership user does not exist
- UsernameDuplicated: there are two or more users with the same username
- EmailAddressDuplicated: there are two or more users with the same email address
- InvalidUserTypeInUser: a user has an invalid UserType
- UserTypeNotFound: the UserType is not found in the application
The sequel-security tool allows you to generate a report with the issues detected in a legacy database running the sequel-security migrate-validate command:
Required parameters:
-c|--connection
//Connection string to the database with the legacy [security] schema to be validated.
Optional parameters:
-r|--references     /* JSON filename with references to the legacy database columns
                      of other applications (WF, PB, Origin, CLM) with security data
                      which will be validated too. */
-v|--verbose        /* Activates verbose mode */
-s|--silence        /* Activate silent mode */
Example 1: Validate the users and authorization entities of all applications from a legacy database called LEGACYDB located at DBSERVER server:
sequel-security migrate-validate -c "Server=DBSERVER;Database=LEGACYDB;Trusted_Connection=True;MultipleActiveResultSets=true" -v
Example 2: Allow other applications (WF, PB, Origin, CLM) to define their columns with security data, so the tool will be able to validate it.
sequel-security migrate-validate -c "Server=DBSERVER;Database=LEGACYDB;Trusted_Connection=True;MultipleActiveResultSets=true" -r "JSON_FILENAME"
The input parameter with the definition of columns to validate will be passed to the tool as a file in json format example:
{
  "Groups": [
    {
      "DbSchema": "workflow",
      "DbTable": "DiaryAction",
      "DbColumn": "assignedGroupId"
    }
  ],
  "Roles": [
    {
      "DbSchema": "workflow",
      "DbTable": "DiaryActionType",
      "DbColumn": "securableId"
    }
  ],
  "Securables": [
    {
      "DbSchema": "workflow",
      "DbTable": "DiaryActionType",
      "DbColumn": "securableId"
    }
  ],
  "Users": [
    {
      "DbSchema": "workflow",
      "DbTable": "Alert",
      "DbColumn": "userId"
    }
  ],
  "UserTypes": [
    {
      "DbSchema": "workflow",
      "DbTable": "DocumentUserType",
      "DbColumn": "UserTypeId"
    }
  ]
}
2. Normalize the database
You have to fix the validation errors found in the legacy database before the migration process. Several errors validations could be displayed because the entities do not have appKey. This should be the first issue to fix. Once the entities have appKey, many error validations will disappear.
These are the actions to normalize each issue:
InvalidKey: Fill the entity key as “{appKey}.{Code}”
InvalidAppKey: Fill the correct entity appKey. The next example display a role with code but not appKey.

InvalidCode: Fill the entity code like the entity key code
NameRequired: Fill the name
DisplayNameRequired: Fill the group DisplayName. The next example display a group where display name is empty

KeyDuplicated: Make sure the entity key is unique
MissingPublicGroup: Create the Public group in the application.
MismatchPermissionApplication: Fix the appKey both the role and securable of a permission to be the same. The next sample display a permission where role and securable have different appKey.

MismatchMembershipApplication: Fix the appKey both the group and role of a membership to be the same. The next example display a user membership where role and group appKey are different
SecurableNotFound: Find the securable and set the correct appKey. If this does not exist, create it. You can also remove the permission.
RoleNotFound: Create the role or remove the membership
GroupNotFound: Create the group or remove the membership
UsernameNotFound: Create the user or remove the membership
UsernameDuplicated: Make sure the user username is unique
EmailAddressDuplicated: Make sure the user email address is unique
InvalidUserTypeInUser: Create the UserType or remove the UserType assignment.
UserTypeNotFound: Create the UserType.
3. Generate migration package
The sequel-security tool allows you to generate a data package by reading [security] schema from a legacy database and mapping to an intermediary data exchange format. The sequel-security migrate command performs simple mappings without any kind of transformation:
Required parameters:
-c|--connection     /* Connection string to the database with the legacy [security]
                      schema to be migrated. */
-o|--output         /* Output path (folder or zip file) where the migration package
                      will be generated. */
Optional parameters:
-a|--application    /* Application key to choose from WF, Sec, Origin, PB, CLM
                      (by default all of them) to be included in the migration package.
                      (multiple allowed)*/
-d|--domain         /* Domain to be exported (all by default).
                      Expected values (multiple allowed): authorization | users */
-val|--validate     /* Validates package before creates output file. */
-v|--verbose        /* Activates verbose mode */
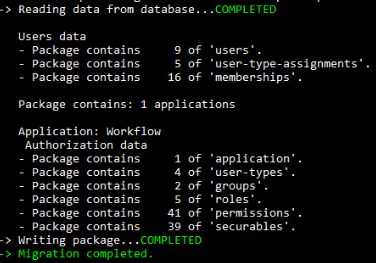
Example 1: Migrate all Workflow entities from a legacy database called LEGACYDB located at DBSERVER server and store it in a ZIP file called WorkflowMigration.zip:
sequel-security migrate -a WF -o WorkflowMigration.zip -c "Server=DBSERVER;Database=LEGACYDB;Trusted_Connection=True;MultipleActiveResultSets=true"
This is a screenshot of migrate execution result:
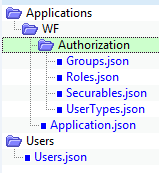
And this is the result of the migrate execution: a JSON file per authorization entity and user:
4. Import authorization entities
The sequel-security import command import the data packages into the new Sequel Security Service.
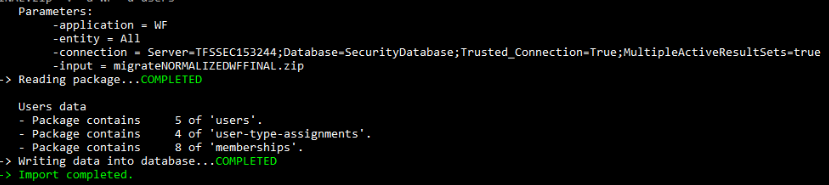
Example: We want to import all Workflow authorization entities into a security database called SECURITYDB located at DBSERVER server from a ZIP file called Package.zip:
sequel-security import -a WF -d authorization -i Package.zip -c "Server=DBSERVER;Database=SECURITYDB;Trusted_Connection=True;MultipleActiveResultSets=true"
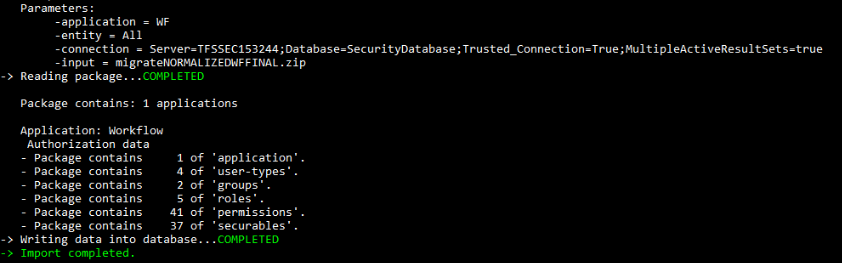
This is a screenshot of the result when importing authorization entities:
5. Import users
The sequel-security import command import the data packages into the new Sequel Security Service.